Создание простой системы регистрации пользователей на PHP и MySQL. Создание и проверка форм Войско index php registration form
When you login into a website or into your mail box, you are interacting with a form.
Forms are used to get input from the user and submit it to the web server for processing.
The diagram below illustrates the form handling process.
A form is an HTML tag that contains graphical user interface items such as input box, check boxes radio buttons etc.
The form is defined using the ... tags and GUI items are defined using form elements such as input.
In this tutorial, you will learn-
When and why we are using forms?- Forms come in handy when developing flexible and dynamic applications that accept user input.
- Forms can be used to edit already existing data from the database
We will use HTML tags to create a form. Below is the minimal list of things you need to create a form.
- Opening and closing form tags …
- Form submission type POST or GET
- Submission URL that will process the submitted data
- Input fields such as input boxes, text areas, buttons,checkboxes etc.
The code below creates a simple registration form
Registration Form
Registration Form
First name:
Last name:
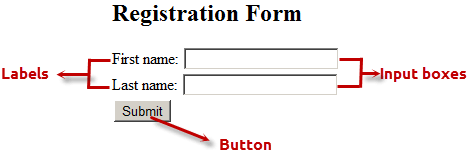
Viewing the above code in a web browser displays the following form.
- … are the opening and closing form tags
- action="registration_form.php" method="POST"> specifies the destination URL and the submission type.
- First/Last name: are labels for the input boxes
- are input box tags
is the new line tag- is a hidden value that is used to check whether the form has been submitted or not
- is the button that when clicked submits the form to the server for processing
The action attribute of the form specifies the submission URL that processes the data. The method attribute specifies the submission type.
PHP POST method- This is the built in PHP super global array variable that is used to get values submitted via HTTP POST method.
- This method is ideal when you do not want to display the form post values in the URL.
- A good example of using post method is when submitting login details to the server.
It has the following syntax.
- “$_POST[…]” is the PHP array
- This is the built in PHP super global array variable that is used to get values submitted via HTTP GET method.
- The array variable can be accessed from any script in the program; it has a global scope.
- This method displays the form values in the URL.
- It’s ideal for search engine forms as it allows the users to book mark the results.
It has the following syntax.
- “$_GET[…]” is the PHP array
- “"variable_name"” is the URL variable name.
| Values not visible in the URL | Values visible in the URL |
| Has not limitation of the length of the values since they are submitted via the body of HTTP | Has limitation on the length of the values usually 255 characters. This is because the values are displayed in the URL. Note the upper limit of the characters is dependent on the browser. |
| Has lower performance compared to Php_GET method due to time spent encapsulation the Php_POST values in the HTTP body | Has high performance compared to POST method dues to the simple nature of appending the values in the URL. |
| Supports many different data types such as string, numeric, binary etc. | Supports only string data types because the values are displayed in the URL |
| Results cannot be book marked | Results can be book marked due to the visibility of the values in the URL |
The below diagram shows the difference between get and post


The registration form submits data to itself as specified in the action attribute of the form.
When a form has been submitted, the values are populated in the $_POST super global array.
We will use the PHP isset function to check if the form values have been filled in the $_POST array and process the data.
We will modify the registration form to include the PHP code that processes the data. Below is the modified code
Registration Form //this code is executed when the form is submitted Thank You
You have been registered as
Go back to the form
Registration Form First name:Last name: checks if the form_submitted hidden field has been filled in the $_POST array and display a thank you and first name message.
If the form_fobmitted field hasn’t been filled in the $_POST array, the form is displayed.
More examples Simple search engineWe will design a simple search engine that uses the PHP_GET method as the form submission type.
For simplicity’s sake, we will use a PHP If statement to determine the output.
We will use the same HTML code for the registration form above and make minimal modifications to it.
Simple Search Engine Search Results For
The GET method displays its values in the URL
Sorry, no matches found for your search term
Go back to the form
Simple Search Engine - Type in GET Search Term:View the above page in a web browser
The following form will be shown

Type GET in upper case letter then click on submit button.
The following will be shown

The diagram below shows the URL for the above results
Note the URL has displayed the value of search_term and form_submitted. Try to enter anything different from GET then click on submit button and see what results you will get.
Working with check boxes, radio buttonsIf the user does not select a check box or radio button, no value is submitted, if the user selects a check box or radio button, the value one (1) or true is submitted.
We will modify the registration form code and include a check button that allows the user to agree to the terms of service.
Registration Form
You have not accepted our terms of service
Thank YouYou have been registered as
Go back to the form
Registration Form First name:Last name:
Agree to Terms of Service:
View the above form in a browser
Creating a membership based site seems like a daunting task at first. If you ever wanted to do this by yourself, then just gave up when you started to think how you are going to put it together using your PHP skills, then this article is for you. We are going to walk you through every aspect of creating a membership based site, with a secure members area protected by password.
The whole process consists of two big parts: user registration and user authentication. In the first part, we are going to cover creation of the registration form and storing the data in a MySQL database. In the second part, we will create the login form and use it to allow users access in the secure area.
You can download the whole source code for the registration/login system from the link below:
Configuration & Upload
The ReadMe file contains detailed instructions.
Open the source\include\membersite_config.php file in a text editor and update the configuration. (Database login, your website’s name, your email address etc).
Upload the whole directory contents. Test the register.php by submitting the form.
The registration formIn order to create a user account, we need to gather a minimal amount of information from the user. We need his name, his email address and his desired username and password. Of course, we can ask for more information at this point, but a long form is always a turn-off. So let’s limit ourselves to just those fields.
Here is the registration form:
Register Your Full Name*: Email Address*: UserName*: Password*:
So, we have text fields for name, email and the password. Note that we are using the for better usability.
Form validationAt this point it is a good idea to put some form validation code in place, so we make sure that we have all the data required to create the user account. We need to check if name and email, and password are filled in and that the email is in the proper format.
Handling the form submissionNow we have to handle the form data that is submitted.
Here is the sequence (see the file fg_membersite.php in the downloaded source):
function RegisterUser() { if(!isset($_POST["submitted"])) { return false; } $formvars = array(); if(!$this->ValidateRegistrationSubmission()) { return false; } $this->CollectRegistrationSubmission($formvars); if(!$this->SaveToDatabase($formvars)) { return false; } if(!$this->SendUserConfirmationEmail($formvars)) { return false; } $this->SendAdminIntimationEmail($formvars); return true; }
First, we validate the form submission. Then we collect and ‘sanitize’ the form submission data (always do this before sending email, saving to database etc). The form submission is then saved to the database table. We send an email to the user requesting confirmation. Then we intimate the admin that a user has registered.
Saving the data in the databaseNow that we gathered all the data, we need to store it into the database.
Here is how we save the form submission to the database.
function SaveToDatabase(&$formvars) { if(!$this->DBLogin()) { $this->HandleError("Database login failed!"); return false; } if(!$this->Ensuretable()) { return false; } if(!$this->IsFieldUnique($formvars,"email")) { $this->HandleError("This email is already registered"); return false; } if(!$this->IsFieldUnique($formvars,"username")) { $this->HandleError("This UserName is already used. Please try another username"); return false; } if(!$this->InsertIntoDB($formvars)) { $this->HandleError("Inserting to Database failed!"); return false; } return true; }
Note that you have configured the Database login details in the membersite_config.php file. Most of the cases, you can use “localhost” for database host.
After logging in, we make sure that the table is existing.(If not, the script will create the required table).
Then we make sure that the username and email are unique. If it is not unique, we return error back to the user.
This is the table structure. The CreateTable() function in the fg_membersite.php file creates the table. Here is the code:
function CreateTable() { $qry = "Create Table $this->tablename (". "id_user INT NOT NULL AUTO_INCREMENT ,". "name VARCHAR(128) NOT NULL ,". "email VARCHAR(64) NOT NULL ,". "phone_number VARCHAR(16) NOT NULL ,". "username VARCHAR(16) NOT NULL ,". "password VARCHAR(32) NOT NULL ,". "confirmcode VARCHAR(32) ,". "PRIMARY KEY (id_user)". ")"; if(!mysql_query($qry,$this->connection)) { $this->HandleDBError("Error creating the table \nquery was\n $qry"); return false; } return true; }
The id_user field will contain the unique id of the user, and is also the primary key of the table. Notice that we allow 32 characters for the password field. We do this because, as an added security measure, we will store the password in the database encrypted using MD5. Please note that because MD5 is an one-way encryption method, we won’t be able to recover the password in case the user forgets it.
Inserting the registration to the tableHere is the code that we use to insert data into the database. We will have all our data available in the $formvars array.
function InsertIntoDB(&$formvars) { $confirmcode = $this->MakeConfirmationMd5($formvars["email"]); $insert_query = "insert into ".$this->tablename."(name, email, username, password, confirmcode) values ("" . $this->SanitizeForSQL($formvars["name"]) . "", "" . $this->SanitizeForSQL($formvars["email"]) . "", "" . $this->SanitizeForSQL($formvars["username"]) . "", "" . md5($formvars["password"]) . "", "" . $confirmcode . "")"; if(!mysql_query($insert_query ,$this->connection)) { $this->HandleDBError("Error inserting data to the table\nquery:$insert_query"); return false; } return true; }
Notice that we use PHP function md5() to encrypt the password before inserting it into the database.
Also, we make the unique confirmation code from the user’s email address.
Now that we have the registration in our database, we will send a confirmation email to the user. The user has to click a link in the confirmation email to complete the registration process.
function SendUserConfirmationEmail(&$formvars) { $mailer = new PHPMailer(); $mailer->CharSet = "utf-8"; $mailer->AddAddress($formvars["email"],$formvars["name"]); $mailer->Subject = "Your registration with ".$this->sitename; $mailer->From = $this->GetFromAddress(); $confirmcode = urlencode($this->MakeConfirmationMd5($formvars["email"])); $confirm_url = $this->GetAbsoluteURLFolder()."/confirmreg.php?code=".$confirmcode; $mailer->Body ="Hello ".$formvars["name"]."\r\n\r\n". "Thanks for your registration with ".$this->sitename."\r\n". "Please click the link below to confirm your registration.\r\n". "$confirm_url\r\n". "\r\n". "Regards,\r\n". "Webmaster\r\n". $this->sitename; if(!$mailer->Send()) { $this->HandleError("Failed sending registration confirmation email."); return false; } return true; }
Updates9th Jan 2012
Reset Password/Change Password features are added
The code is now shared at GitHub .
Welcome back !
License
The code is shared under LGPL license. You can freely use it on commercial or non-commercial websites.
No related posts.
Comments on this entry are closed.
У Вас в браузере заблокирован JavaScript. Разрешите JavaScript для работы сайта!
Работа с формамиДля передачи данных от пользователя Web-страницы на сервер используются HTML-формы. Для работы с формами в PHP предусмотрен ряд специальных средств.
Предварительно определенные переменныеВ PHP существует ряд предварительно определенных переменных, которые не меняются при выполнении всех приложений в конкретной среде. Их также называют переменными окружения или переменными среды. Они отражают установки среды Web-сервера Apache, а также информацию о запросе данного браузера. Есть возможность получить значения URL, строки запроса и других элементов HTTP-запроса.
Все предварительно определенные переменные содержатся в ассоциативном массиве $GLOBALS . Кроме переменных окружения этот массив содержит также глобальные переменные, определенные в программе.
Пример 1 Просмотр массива $GLOBALSВ результате на экране появится список всех глобальных переменных, включая переменные окружения. Наиболее часто используемые из них:
| $_SERVER["HTTP_USER_AGENT"] | Название и версия клиента | Mozilla/5.0 (compatible; Googlebot/2.1; +http://www.google.com/bot.html) |
| $_SERVER["REMOTE_ADDR"] | IP-адрес | 144.76.78.4 |
| getenv("HTTP_X_FORWARDED_FOR") | Внутренний IP-адрес клиента | |
| $_SERVER["REQUEST_METHOD"] | Метод запроса (GET или POST ) | GET |
| $_SERVER["QUERY_STRING"] | При запросе GET закодированные данные, передаваемые вместе с URL | |
| $_SERVER["REQUEST_URL"] | Полный адрес клиента, включая строку запроса | |
| $_SERVER["HTTP_REFERER"] | Адрес страницы, с которой был сделан запрос | |
| $_SERVER["PHP_SELF"] | Путь к выполняемой программе | /index.php |
| $_SERVER["SERVER_NAME"] | Домен | сайт |
| $_SERVER["REQUEST_URI"] | Путь | /php/php_form.php |
PHP-программу обработки ввода можно отделить от HTML-текста, содержащего формы ввода, а можно расположить на одной странице.
Пример 2 Пример обработки ввода UsernameЧтобы получить данные формы, используется глобальная переменная $_POST . Она представляет ассоциативный массив данных, переданных с помощью метода POST. Используя ключи, мы можем получить отправленные значения. Ключами в этом массиве являются значения атрибутов name у полей ввода формы.
Так как атрибут name поля ввода логина имеет значение login (), то в массиве $_POST значение этого поля будет представлять ключ "login": $_POST["login"]
И поскольку возможны ситуации, когда поле ввода будет не установлено, например, при прямом переходе к скрипту: http://localhost:8080/login.php . В этом случае желательно перед обработкой данных проверять их наличие с помощью функции isset() . И если переменная установлена, то функция isset() возвратит значение true .
Теперь мы можем обратиться к форме:
И по нажатию кнопки введенные данные методом POST будут отправлены скрипту login.php :
Необязательно отправлять данные формы другому скрипту, можно данные формы обработать в том же файле формы. Для этого изменим файл form.php следующим образом:
Вход на сайт
Логин:
Пароль:
Большое значение в PHP имеет организация безопасности данных. Рассмотрим несколько простых механизмов, которые могут повысить безопасность нашего веб-сайта.
Но вначале возьмем форму из прошлой темы и попробуем ввести в нее некоторые данные. Например, введем в поле для логина "alert(hi);", а в поле для пароля текст "пароль":
После отправки данных в html разметку будет внедрен код javascript, который выводит окно с сообщением.
Чтобы избежать подобных проблем с безопасностью, следует применять функцию htmlentities() :
If(isset($_POST["login"]) && isset($_POST["password"])){
$login=htmlentities($_POST["login"]);
$password = htmlentities($_POST["password"]);
echo "Ваш логин: $login
Ваш пароль: $password";
}
И даже после ввода кода html или javascript все теги будут экранированы, и мы получим следующий вывод:
Еще одна функция - функция strip_tags() позволяет полностью исключить теги html:
If(isset($_POST["login"]) && isset($_POST["password"])){
$login=strip_tags($_POST["login"]);
$password = strip_tags($_POST["password"]);
echo "Ваш логин: $login
Ваш пароль: $password";
}
Результатом ее работы при том же вводе будет следующий вывод.